The Better House Design: Traditional or Contemporary Design?

You want to build a new house or do a big renovation, but you don’t know what style you want. Is it hard to choose between a traditional style with comfortable furniture and classic designs and a modern style with sleek, clean lines? You’ll be glad to hear that you can have them both in the popular transitional style.

The eloquent luxury transitional style lets you choose your favorite parts from both traditional and modern styles. The result is a style that is comfortable, classic, and stylish.

When you build a custom transitional home, one of the best parts is that you can pick your favorite parts from each style without sacrificing the look, value, or quality of the finished product.

So, how can you do this, and what should you think about it?

Here are some simple ways to describe traditional and modern styles.

The traditional style is a way of designing and building that looks like the classic styles of old Europe. It has crown molding, a wainscot, a chair rail, and coffered ceilings. It also has natural materials like wood.

Modern style is all about simple, clean lines, slim legs, and sharp angles that make things look open and airy. It relies on using things made by people, like glass, metal, and concrete.

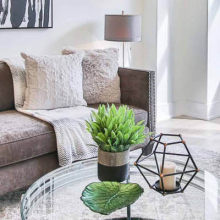
The transitional style is a mix of traditional and modern styles. It has soft lines and comfortable furniture of the traditional style without all the fuss, and it keeps the modern color palettes and clean lines.

Here are some things to think about when making a transitional style:

1. Choose a neutral color scheme like grey, sand, or white that fits the traditional style. If you want to add some contrast, think about adding some bold accents.

2. Don’t make the woodwork too fancy. Avoid fancy crown molding and wainscot to keep with the modern style. Keep it simple.

3. Style of change Modern lighting is an exciting way to change the look of your home. Lighting can make a room look amazing, and as the number of options grows, fixtures are becoming more popular. Choose a modern chandelier or molecular light as the room’s eye-catching centerpiece.

4. Metallic elements are very popular in the popular transitional style of today because they can be used with any design style. Incorporate gold, bronze, or copper through faucets, lighting, side tables, and other accessories. Check out our blog, The Art of Mixing Metals in Your Home.

5. Adding carpet for texture is a big part of the transitional design. They hold the furniture in place, add color, and make the floor soft and comfortable. A traditional woven or knotted rug can add texture and pattern, and it’s best to choose neutral colors to go with the design.

6. You can also move from traditional to transitional with modern art. Accents are very important in transitional-style homes, and those accents can make the design look either modern or traditional. Choose your favorite piece of modern art to make a bold focal point. And to avoid looking too busy, it’s best to keep things simple.

Watch our latest video, “How to Get Started on Designing Your Home,” for more in-depth help.

Our advice… Create something and have fun!

LK West Valley City General Contractors is a family business that has been around since 2006. It is a design-build company that specializes in high-end remodels, home additions, and custom homes. Our main office is in West Valley, UT. The National Association of the Remodeling Industry has given us awards, and the Better Business Bureau has given us an A+ rating.

Creative Commons Attribution: You can share this article in its entirety as long as you give credit to LK West Valley City General Contractors and include a link back to this page.

How Can I Prevent Mice From Entering My Garage?

Since many homes are constructed close to fields and other greenery, which serve as their natural habitats, mice are more likely to infiltrate buildings in quest of food and refuge. In contrast to southern states, which are typically always warm, California has seasonal weather variations. During the wintertime, mouse activity is exceptionally high. They look for cover, which is frequently easily accessible in garages. In particular, this holds for rarely utilized garages. Here’s how to keep mice out of the garage.

What makes garages a mouse magnet?

Whether we like it or not, rodents have become highly accustomed to coexisting with humans. Our homes and garages protect their tiny bodies from snow, sleet, hail, rain, winds, predators, and freezing conditions. Even worse, mice eat stuff that we wouldn’t consider eating. For instance, mice frequently eat grass seed and bird food stored in garages.

In homes with minor human activity, mice build their nests. To make their nest, they look for locations where they are least likely to be disturbed. One mouse will build a nest where it will dwell and rear its young. Pups leave the nest and create their nests when they are old enough to live independently.

What telltale indicators do mice leave behind in my garage?

Mice consume a lot of food because they are so little while awake at night. Droppings are left behind and appear to be a grain of rice-shaped, black or brown color. As a result of mice living in big colonies, dropping piles are reasonably typical. Besides seeing mouse droppings, you might also observe mice. You probably won’t see them rushing through the center of a room because they often creep along the borders of walls.

If mice are in your garage, they will eat dog food, bird seed, lawn seed, or other products stored in bags and containers that are simple to open. Look for holes in the bags that have been nibbled apart by mice. You might also find seeds scattered about in the garage because mice are untidy eaters.

What can I do to keep mice out of my garage?

Make the garage as undesirable to mice as you can if you want to keep them out of your garage. Make your garage rodent-proof by using the following advice:

  • Maintain bird seed, dog food, and grass seed in airtight containers or bins.
  • Organize your workspace and lessen the clutter.
  • Fill up any cracks or openings leading into the garage.
  • Reducing tree limbs that are in contact with the garage roof
  • Trash cans should be taken outside and sealed tightly.
  • Store your firewood outside your garage and home as much as possible.

Completely sealing entry sites is one of the most crucial things you can do to keep mice out of your garage. Mice can fit through a dime-sized opening. Never undervalue a mouse’s tenacity to use these openings to get into your garage! Just because you can’t see any mice doesn’t imply there aren’t many of them present. In a single year, a single mouse can give birth to between 25 and 60 young.

Tips for Spring Maintenance on Asphalt and Concrete

The first indications of spring, ah. In the backyard, robins are looking for worms to eat. The garden centers sell pansies. There are growing cracks in the driveway. Not all signs of spring are pleasant. Asphalt and concrete experience hardship from spring thaw after the wear and tear of winter. Even while a well-laid surface should be worry-free, it will occasionally need to be touched up to keep it looking good. Spring asphalt maintenance ideas are found below.

March is quickly approaching, and with it will come rising temperatures during the daytime with more sunlight pounding down on the asphalt and concrete driveways, causing internal expansion. Overnight, however, you will experience contraction due to the freezing temperatures.

On your asphalt surfaces during the winter, snow and ice frequently freeze and thaw. Water may collect and seep through your asphalt surface during the freeze-thaw cycle if your asphalt is graded improperly or has uneven patches. Since water expands when it freezes, your asphalt will break as a result. Potholes and cracks may result from these freezing and thawing cycles; contributing factors include moisture, plow techniques, the material itself, and the design of the driveway or lot.

Your driveway can require adjustment if it is bordered by high land, made of soil that retains rainwater, or has several low spots. In order to prevent water from pooling, the driveway needs to have a crown, which is a slightly higher place in the center that slopes to either side. Lower areas on either side of the driveway should allow water to drain away, occasionally into drainage ditches.

The most asphalt pavement deterioration might happen in the early spring. Water in the aggregate base and pavement freezes from the surface of the pavement all the way to the subgrade during the winter. The frozen pavement starts to defrost from the surface down to the subgrade during the spring thaw. Water from the thawing pavement is thus trapped in the materials beneath the pavement while the subgrade is still frozen. As a result of the subgrade becoming saturated, which makes it substantially weaker, the pavement is more easily damaged by vehicle traffic.

What can I do to safeguard my driveway and/or investment? To safeguard your pavement, start with preventative maintenance. Most water will be prevented from reaching the subgrade by caulking cracks and fixing potholes. Analyze the design of your driveway or property. Figure out where the water is going and where it is coming from. Is it making its way through the gaps of a storm sewer? Asphalt pavements are naturally vulnerable to water, thus it is advisable to make sure the drainage area surrounding your snow heaps is adequate to remove water from the pavement as quickly as possible.

Here are some important details to remember:

  1. Due to its inherent porosity, asphalt can absorb water from its surroundings. In the winter, water that seeps through asphalt may expand and freeze beneath the driveway’s surface, leading to cracks and other issues. Your driveway will begin to fracture and deteriorate as more cracks form because the more water it can hold, the more water it will absorb. The lifespan of your driveway may be greatly reduced as a result of these issues.
  1. Winter may be especially difficult on asphalt because the ground is frequently covered with ice and snow.
  1. Your driveway may crack for a variety of reasons, including excessive weight, buried tree roots, soil movement, and, of course, excessively cold weather. Concrete is porous, so it can be penetrated by rain or snow, which can then grow during freezing temperatures and shrink during warming ones. A driveway may crack, degrade, or even flake due to constant expansion and contraction during the fall and winter.
  1. De-icers using ammonium sulfate, magnesium acetate, and ammonium nitrate should not be used on concrete since they may erode the surface. The same should be true for chemicals used on lawns; they shouldn’t be permitted to come into touch with concrete. Asphalt can also be damaged by chemicals, like gasoline and oil.
  2. Driveways must be shielded from encroaching vegetation. Trim the grass off the edges of the driveway to prevent tree roots from pushing the surface upward.
  1. The right drainage is also crucial. Runoff can help remove standing water when suitable drainage is in place. Even driveways that seem to flat contain a small gradient for drainage.
  1. Your gutters are essentially another crucial drainage system. Maintain a spout direction that is away from your driveway. Melting snow and ice can start to run onto your driveway’s asphalt if they are aimed in that direction. In addition to harming your asphalt, this may also provide a safety risk.

Bathtub Liners: Is It for You?

When you’re looking to give your bathroom a new look, a bathtub liner may seem like an ideal replacement or a bathtub refinishing solution.

Tub inserts, on the other hand, have a number of drawbacks that you may not notice until it is too late.

Don’t slap a band-aid on the problem if you can fix it for less money!

Bathtub Liners: What are the Advantages Them?

It’s common to hear the term “tub liners” or “tub inserts” used to refer to molded plastic or acrylic covers that go over an existing tub.

Six Problems Caused By Bathtub Inserts

  1. Plastic is being used in place of porcelain.

Your present tub’s beauty is sacrificed when you use an acrylic or plastic bathtub liner to cover it. In spite of its durability, acrylic does not hold up as well as a porcelain tub. It’s common knowledge that tub liners are prone to breaking. If you want to use the tub often, you should keep in mind that acrylic and plastic have a different feel than porcelain, which is something to keep in mind.

  1. Prices for Tub Liners tend to be higher.

While most people believe that inserts are a more affordable alternative than refinishing, the truth is that liners are typically more expensive than refinishing. While refinishing just costs a few hundred dollars, liners may potentially cost thousands of dollars.

  1. Leaking Bathtub Inserts are Possible.

In spite of the fact that tub liners are meant to fit tightly over your tub, they are bonded and caulked into place. Smells, mold, and mildew may build up between the liner and the original tub. It’s tough to get rid of the water, and it will build up again.

  1. It might take weeks to get them installed.

It might take weeks or even months from the time you sign the contract with your chosen contractor to the time your bathtub liner is installed. You must provide the manufacturer with the measurements of your tub in order for them to produce and deliver the liner. The expert will next have to schedule a time to install your new lining.

  1. A plumber will be required.

The increased height of the cover demands a plumber’s adjustment of the drain and overflow. It’s easy to slip the cover over your tub.

  1. Difficulty in Getting a Replacement

Tub liners degrade with time and will need to be changed at some point. When it comes to removing the old liner, you may have to cut it out of the tub to get it out.

Your time and money may be saved if you refinish.

Refinishing the bathtub is a one-day job that costs a fraction of what it would cost to install a new tub liner. No demolition is required, mold or mildew is eliminated, and no plumbing is required. Your porcelain tub will be restored to its former opulence, if not better, thanks to our restoration process. We provide a broad selection of color options to ensure that your tub matches your home’s aesthetics at all times

Knowledge of Siding’s R-Value

The R-value of insulation gauges how well it keeps heat from escaping a structure. It’s critical to understand what this phrase implies if you’ve run across it while searching to renovate your house with new vinyl siding. You can learn more about vinyl siding R-value and what to take into account when selecting a new exterior for your house from the knowledgeable staff at CMB Edison Stucco & EIFS Repair. What is R-Value for siding?

R-Value Definition

Your home’s airflow is restricted by adequate interior and exterior insulation. A material’s capacity to limit heat flow is measured by its R-value. It is based on an expression called “R-factor,” which is calculated by sandwiching a material between two plates and measuring the heat flow through it. One square foot of material with a thickness of one inch is used for these lab tests. The material’s outside surfaces vary in temperature by one degree Fahrenheit. The material’s thermal conductivity is calculated using the heat flow rate expressed in BTUs per hour.

The R-factor is multiplied by the material’s thickness to get the R-value. For instance, if the thickness of the insulating material is 1.5 inches and the R-factor is 2, the R-value will be 3. When it comes to stopping heat from leaving and keeping cold air out, the material performs better with a higher R-value and vice versa during warmer months.

Insulation within

The majority of people image fluffy fiberglass rolls or walls filled with spray foam when they think about insulation. Although this sort of insulation is efficient, some air leakage may still occur, costing you money in heating and cooling expenses. The wooden studs in your walls may have insulation between them, but there isn’t insulation on the studs themselves. 25% of a home’s wall area may be made up of studs. The mechanism of thermal bridging allows energy to traverse them from the cozy inside of your house to the brisk outside. Your house may not be as warm as it might be due to these energy leaks, which could cost you money.

Vinyl siding with insulation

These studs and other areas are covered with exterior insulated vinyl siding, which helps prevent thermal bridging and lowers energy loss. Depending on the brand, style, and amount of siding you choose, high-quality insulated vinyl siding generally ranges in R-value from 2.0 to 4.0.

The average R-value for vinyl siding is 0.61. The R-value of high-quality vinyl siding is greater than that of many other construction materials, whether it is insulated or not. The R-values for other kinds of construction materials are as follows:

  • 0.37 for fiber cement.
  • 0.40 for stucco
  • 0.44 for Brick veneer minus 
  • 0.11 for Veneer of stone

You may better understand the siding R-value and choose the material that may be best for you by discussing your demands and the look you want to achieve with an expert builder.

Further Advantages of Vinyl Siding

Regular and insulated vinyl siding both provide advantages: In addition to having a greater R-value, which may assist improve the energy efficiency of your house.

Low care – Vinyl siding can be cleaned with a little mild soap and a garden hose and doesn’t need painting, caulking, or staining.

Durability – Good vinyl siding is capable of withstanding the weather, including UV radiation, strong winds, and snowstorms. It also resists moisture and bugs, which helps stop deterioration.

Versatility – Vinyl siding may be found in almost every color, texture, and design you can think of, including siding that mimics real wood or stone.

Curb appeal – First impressions are crucial, and although siding R-value and energy efficiency are vital, curb attractiveness is equally crucial. Installing vinyl siding improves curb appeal and may raise the value of your house, whether you’re selling it or just want it to stand out from the rest.

Contact Us For More Information On Siding R-Value

For more than 65 years, CMB Edison Stucco & EIFS Repair has served clients in Central and Northern New Jersey with excellent workmanship, premium products, and customer service second to none. Contact us online or give us a call at (201) 822-2206 to arrange for a free estimate to learn more about our vinyl siding options and the other services we provide. To meet your demands and your budget, we provide numerous home renovation financing solutions.

Bathtub Liners & Inserts: A Quick Guide

When you want to update the design of your bathroom, a bathtub liner may seem like a perfect option for a replacement or even refinishing. Unfortunately, bathtub inserts have a number of issues that you may not see until it is too late.

Don’t apply a bandage when you can cure the issue for less money!

What are Bathtub Liners?

Bathtub liners, also known as bathtub inserts, are molded plastic or acrylic coverings that are bonded and caulked into place over your existing tub.

6 Issues Related to Bathtub Inserts

  1. Switching from Porcelain to Plastic

When you install a bathtub liner over your existing tub, you exchange the aesthetic appeal of a porcelain tub for that of acrylic or plastic. Although acrylic is durable, it is not as durable as porcelain. It is typical for tub liners to develop cracks. Acrylic and plastic have a different feel than porcelain, which is something to consider if you prefer soaking in the tub on occasion.

  1. Tub liners are more costly.

In spite of the common misconception, that bathtub liner are a cost-effective option for refinishing, liners are often much more costly. Liners may easily cost several thousand dollars, but refinishing costs just a few hundred.

  1. Inserts for bathtubs may leak.

Although tub liners are designed to fit as tightly as possible over your tub, they are nevertheless glued and caulked into place. This makes it simple for water to enter the space between the liner and the existing tub, leading to stink, mold, and mildew. Water removal is difficult, and water accumulation will occur again.

  1. It may take many weeks to install.

The installation of your bathtub liner might take weeks or even months from the moment you sign the contract with the contractor you’ve selected. Your tub’s dimensions must be provided to the manufacturer, who then makes and ships the liner to the installer. The technician must then plan a time to install your liner.

  1. You Must Contact a Plumber

It may seem simple to slip a cover over your bathtub, but the increased height will need a plumber to adjust your drain and overflow.

  1. Replacement is challenging

Your tub liner will eventually wear out and need replacement. The procedure of removing the old liner is difficult and typically entails cutting the liner out of the tub.

Save Money and Time Through Refinishing

Refinishing your bathtub is a one-day job that costs a fraction of what a liner would. There is no need for demolition, mold or mildew danger, or a plumber. Our restoration method returns your porcelain tub to its original splendor, if not better. We provide a choice of color options so that your tub will always complement your interior design. Request your free quotation now!